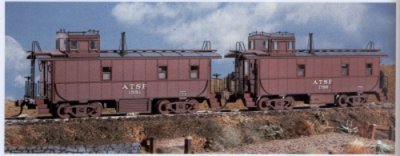
Santa Fe has always called their cabooses "waycars". Many large scale manufacturers make a caboose that is close to the Santa Fe offset cupola prototype. LGB has a model of the Santa Fe CE5 which is very good, but very oversized (1/24) for running with Aristo and USA main line freights. In fact, it tends to dwarf some 1:29 locomotives. Aristo also has a caboose that is close, but is too short by about five scale feet. It is however 1/29 scale, and fits with both USA and Aristo rolling stock and motive power. If you can overlook the length (35 feet), it is a good model to make a conversion with, and this is the one I will use in this article. It comes in the modern Santa Fe paint scheme, which I will change and back date when I re-paint and re-letter. The caboose is easy to disassemble and should be before making this conversion. An exploded diagram is available on the Aristo site which will help with this step.
The windows on the Aristo model are wrong for a Santa Fe caboose. This can be easily remedied with a piece of sheet styrene. On the real caboose there are three windows on the right side, and five windows on the left side, your orientation being that the cupola is toward the rear of the caboose. We are going to work on the right side of the caboose first. The rearmost window will have to be filled in on this side, leaving just three windows. The left side of the model has four windows. On the real caboose, there is a fifth window on the left side, which can only be properly placed if you splice an additional section into the entire caboose. I am going to stick with four windows on this side as "good enough" for this project.
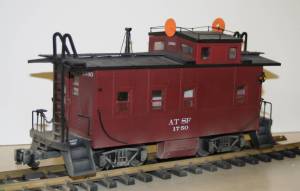
The roof is the next area that we will work on. Santa Fe used wooden running boards on their caboose roofs, and for this project, I will retain the Aristo boards that come with the model. The right side lateral board that goes across the roof at the rear of the cupola will be removed, so that only one lateral board exists on the left side of the main board. Also remove the running board on the roof of the cupola. Fill all the holes with hobby filler paste (I use Squadron white putty). Remove all grabs on the roof and on the front and rear of the cupola. Fill all the holes on the sides of the cupola roof and cupola ends. I decided to sand the roof flat and recover it with a thin sheet of styrene rather than fill all the holes that were left from the grab removal. You will need to order a set (10) handrail posts from Trackside Details (TD-21). Four of these posts go on each end of the cupola, and one is centered between the side windows on each side. I new handrail can then be bent and made from brass rod. This new handrail goes all the way around the cupola roof similar to a luggage rack.
This car comes with a steel toolbox on each side, which is correct per the prototype. When radios came into use, one toolbox was removed and a battery box was added in its place. Many of these cars also had wooden tool boxes which you can fabricate from scrap styrene, if you want your car to have a different look. I retained the Aristo tool boxes, and used styrene to cover the rear since the originals were just open shells. Paint the rear of the toolboxes black.
The Aristo smoke jack is way out of scale. If you do not want it to smoke (and I keep my switch turned off), replace it with one from USA Trains, or fabricate one from styrene. The hole in the roof can be covered with a piece of thin sheet styrene, and your new smoke jack can be glued in place. Guy wires can be made from thin brass rod and also glued in place. These can be placed at the sides of the smoke jack or front and rear, since the prototype had them installed both ways.
The marker lights provided by Aristo are oversized and can be replaced by those made by Ozark Miniatures (0093 or 0095), or Tackside Details (TD-15 or TD-20). These are hollow and can use the existing Aristo lighting circuit and LEDs to light them. If you do not plan to keep the existing Aristo markers, they can be cracked open so that the same LED will work with your new markers. Aristo uses red LEDs in their markers, but I plan on using clear bulbs since they give a more prototypical light. This means that I will rewire the bulbs to get power directly from the trucks, which is not big deal since the caboose is already in pieces. Marker lights were hung on either end of the caboose depending upon the direction of travel. Since we will be re-hanging markers on the rear side of the short end of the caboose, fabricate a couple of "L" brackets for the long end of the caboose and drill and glue them in place. Note: per ATSF practice until 1960, the markers should show red to the rear and amber or yellow to the front and sides. These jewels (yellow) are available through Ozark Miniatures, or if you are lucky, can be purchased at Michaels Crafts in a bag of assorted colors. I saved all the red and green jewels, along with the amber ones for future projects. To illuminate the jewels you have to scrape off the silver backing before gluing them into your marker. It is easiest to sand of the backing with fine wet sand paper.
All window glass was easily masked with masking tape. The whole car including cupola is sprayed with Floquil's ATSF Mineral Brown. The toolboxes are also painted Mineral Brown. I went with the pre-1945 scheme and painted the roof, including the cupola roof, with Floquil's Grimy Black to represent the anti-slip black that Santa Fe used. All ladders and grabs were painted with Floquil's Engine Black. The underbody of the caboose and end sills stay black, so no painting is required. When dry, the model was sprayed with Testor's Glosscote and allowed to dry for 24 hours. I had custom decals made by Stan Cedarleaf in Arizona. All Santa Fe cabooses had white 4" numbers above their end doors, and 3" numbers on the ends of the cupolas. The sides of the caboose had a white ATSF and a number below it. I kept the numbering to their 1751-1874 series. Once the decals were dry, I sprayed the whole caboose with Testor's Dullcote. I then re-assembled the caboose. The lower windows and those in the doors should have a piece across them horizontally, since they were single hung and supposed to open for ventilation in real life. I made these pieces out of strip styrene and painted them Mineral Brown before attaching them to the windows. For some super detail, you can add window screens to your caboose. The material used was brass mesh sold at the hobby shop. This was cut to fit the lower half of all the windows, and painted mineral brown before being glued in place.
Lightly weather this car, as the Santa Fe kept them clean and freshly painted for most of their life. If you want to add an extra detail, see my article following on the wig wag caboose signals that were distinctly Santa Fe. I added them to mine, and it really made a difference in my model.