The steam locomotive has always been a magnificent creation of man. We have many fine models available to us in large scale today, which help us to bring back the glory days of steam railroading on our miniature empires. This article will deal with weathering steam locomotives to make them more realistic. While I have done other articles on weathering, this is my first shot at this particular topic. Hopefully this article will give you some information that you can use for your own modeling work.
Out of the box these model steam locomotives are crisp and clean, which is quite unlike their full sized brothers. During the first half of the 20th century, most hard working locomotives lost their shine soon after they were repainted. They became dirty real quick, and in the late 1940's and 1950's these steamers ran out their lives with very little maintenance and no new paint.
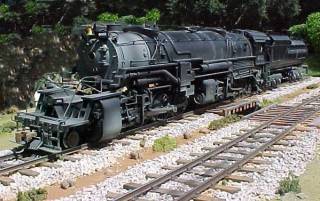
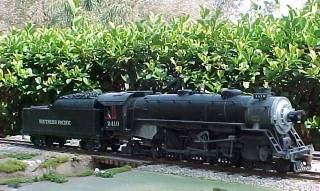
Real weathering begins on a steam locomotive as soon as it is pulled out of the roundhouse, fueled, watered, and fired up. When new these locomotives were painted with shiny black enamel, but in operation each part soon turned a different color. All paint became a grayish-black color from smoke, soot, and the weather (sun, rain, snow), and of course the shine soon soon disappeared. The firebox, smoke box, and boiler below the pop valves and whistle took on an ash gray color. Water leaks and condensing steam from washout plugs, pop valves, and whistles landed on the boiler, leaving light gray streaks and deposits of scale. The expansion and contraction of pipe joints and boiler fittings left both rust spots and drip marks. The drivers kicked up dirt from the roadbed, coating the running gear, trucks, pilot, lower part of the tender, and rear of the tender with a fine layer of dust and grime. The color of this dirt depended upon what part of the country the locomotive ran through. Parts subjected to rubbing or friction would turn rusty due to moisture hitting bare metal. These areas include coupler faces, air hose glad hands, and polling pockets. The tender had its own unique weathering pattern especially from taking on water. The water would pool on the tender deck and run down the sides causing streaking and rust. Coal dust would wash down the sides, and fuel oil would also stain the deck and sometimes spill down the sides if oil was the source of fuel for the locomotive. Dirt kicked up by the locomotive also coated the trucks and lower sides of the tender body. Broad, light gray streaks often appeared on the sides of the tender from steam condensing and leaving a deposit of scale.
I use mostly Floquil paints for weathering my models, spraying their lacquers from an airbrush, and making my washes with their acrylic paint and alcohol. The lacquer paint colors I use are as follows; Grimy Black, Engine Black, Grime, Gray Primer, Rust, and Roof Brown. The acrylic colors used are; Oily Black, Engine Black, EL Gray, and D&H Gray. The following dirt colors from the various regions can be mixed using the following formulas of Floquil lacquer. These were passed on to me by a custom model painter, and should be sprayed on running gear, trucks, pilot, and tender as mentioned above. Northeast-Earth, Southeast-3 parts Earth, 1 part Oxide Red, Midwest-3 parts Earth, 1 part Mud, Mountain States-3 parts earth, 2 parts grime, Desert Southwest-Dust, Northwest-3 parts earth, 1 part roof brown. I have also used weathering powders in some cases, which I mail ordered from Micro-Mark. The brand name is Doc O'Brien's Weathering Powders and they come in a set of 12 colors. They can be applied dry, or mixed with alcohol to make washes. Another product that is very good for weathering is called Rustall which is actual rust powder that can be mixed with alcohol and brushed on your model.
I start my weathering by spraying the drivers and running gear with Engine Black while the locomotive is running in a test stand. This gets rid of the shiny wheels and running gear that seem to come on every steam locomotive model. My next step is to airbrush some light gray around the pop valves, whistle, boiler check valves and steam turret near the cab, if the locomotive has one. I then prepare a gray wash and let it drip from those same areas and also from the boiler wash out plugs. Some rust can then be added to pipe joints, washout plugs, brake shoe faces, couplers, springs, and journal box lids. For new rust use Floquil Rust, and for old rust, use Roof Brown. Rustall works best on your couplers, since it will not gum up the mechanism and prevent then from operating properly. I spray Floquil Dust along the top of the running boards, cylinders, and pilot deck. I then load my airbrush with Floquil Grimy Black and lightly overspray the entire top of the locomotive including the cab roof to simulate soot. With a light touch, I spray the sides of the firebox, smokebox and stack with the same Floquil Grimy Black. I take the roof brown and brush paint the pilot wheels and trailing truck wheels to simulate old rust. As a last touch, I take the dirt color for my region, and gently spray the running gear while it is turning, the front of the pilot, the lower body, the cylinders, and the rear of the locomotive.
The tender weathering starts with a coat of grimy black sprayed lightly over the tender deck. I then add oil spills around the filler hatch if the locomotive is a oil burner. A gray wash is brushed around the water filler hatch and let run down the sides of the tender. Some rust can be added to this area as you see fit. Rust on the coupler is again done with Rustall. Wheels are painted with roof brown to simulate old rust. The entire underbody and both ends are then sprayed with your earth weathering color to simulate dirt kicked up by your locomotive. Any paint on wheel treads can be easily cleaned off with a Q-Tip and thinner.
When finished, you will now have a locomotive that looks like it has been out on the road earning revenue for your railroad. Remember, using photographs of the real locomotives can be a significant aid to your weathering procedure. These photos will give you a better idea of what areas of your locomotive should be rusty, grimy, sooty, etc. While freight locomotives became very grimy during service, passenger locomotives were often washed down with oily water or steam before each run. They accumulated their share of road grunge, but it was not as much as the freight locos or switchers, so go lightly on your passenger steamers, and once again, use photos if you are not sure.