I finally found a used Aristo Doodlebug and bought it for my railroad. The Southern Pacific had one in the 1920's. I found a picture of it in the Carbuilders Cyclopedia 1940 to guide me in my conversion. This car only has one power truck, so it is a very simple piece of rolling stock with little ability to pull many cars. It is based on the Aristo heavy weight coach. The roof is not right for the Southern Pacific, by I could not find a substitute that would work.
My car was a little rough and definitely needed some work. It ran well, but cosmetically I had some work to do. The roof had done its typical warping in the heat, and the previous owner had tried to glue it in place with no success. To remove the roof, you have two screws to loosen in the rear. These are accessed through two holes in the floor with a long bladed phillips screwdriver. Once the screws were removed, the roof was carefully pried off. I then spent time removing the dried glue from the roof and the top of the car with sandpaper and a Dremel.
My next step was re-gluing the inside wall near the baggage compartment, and removing the Playmobile figures that had been glued to the seats. I have six Aristo seated figures that I am going to glue to the seats along with a standing Conductor. I also added some USA seated figures which are smaller and look like children. The windows in the interior wall and baggage compartment were sprayed with Testor's Dullcoat so they look frosted.
I removed the lavatory window which is painted white. With some paint thinner on a rag, I cleaned off half the paint so the window looks like it has a half-drawn shade, and the interior details are now visible.
The Aristo couplers were removed and Kadees were added. I put a modified #787 on the pilot end and a #831 on the rear. The Kadee coupler height gauge was used to make sure the couplers were at the right height. These cars rarely pulled anything, but the couplers will allow mw to pull a coach boxcar on the branch line as sometimes was the practice.
The previous owner broke the door on the right rear vestibule. I put it back in place, and let it swing since the spring was lost that kept it closed.
The front three exhaust stacks were drilled out so that I can add a smoke unit in the future if I choose to. The smoke unit will easily fit in the baggage compartment along with a sound system and speaker. Only Phoenix makes a Doodlebug sound system. I built a speaker box out of styrene and secured it in the baggage compartment along with the Phoenix sound system. I connected the Phoenix system to power from the red and black wires from the front power truck. I removed two windows from the celestory roof to let the sound out of the baggage compartment.
To control the horn, I installed a reed switch on the rear of the front power truck. The horn now blows when the reed switch passes over a magnet.
The interior lights flicker a lot because they pick up power from some metal tabs on the roof that touch similar tabs on the car body. I bypassed this system and added a plug which provides for a more solid connection, and can be unplugged when the roof is removed. The bulbs themselves were replaced with yellow LEDs which give the car a more realistic look at night. I added a rear headlight from my parts box and connected it with a 50 Volt 1 Amp diode from Radio Shack (276-1101) to make it directional. I also added a pair of marker lights to the rear which are also diode controlled so they are off when the car is backing up or running in the opposite direction when the rear headlight is illuminated.
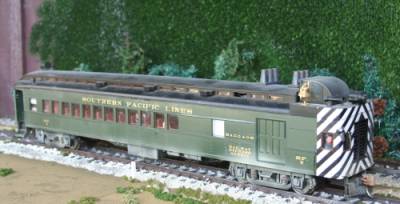
I ordered Southern Pacific decals in gold from Stan Cedarleaf. The original lettering was removed very carefully with brake fluid. The exterior was washed with soap and water, and the new decals were applied. I sealed them with a light spray of Testor's Glosscoat.
The roof was re-attached. I followed George Schreyer's tips and drilled a small hole between the 3rd and 4th window through the roof and car body. I then pushed the roof down and inserted a small brad in the hole to help it stay down. Others have used music wire, or an HO rail spike. They all work well, and prevent the roof from bowing up and warping in the heat.
The car was given a light coat of weathering and is ready to hit the rails.